0%

AWS CLI(command line interface) 的使用過程中,可能需要在不同的配置之間做切換,例如從 production 轉換到 development 環境。在 ~/.aws/config~/.aws/credentials 設定好後,基本的切換方式包含

  1. 在 AWS CLI 後面加上 --profile user1 即可使用 user1 profile。
    例如

    1
    2
    $ aws s3 ls --profile user1
    2018-06-11 20:45:20 test-bucket
  2. 設定 AWS_DEFAULT_PROFILE,例如 export AWS_DEFAULT_PROFILE=user_name。設定好了 AWS CLI 就會使用該帳號。

上述方法切換前,都需要改動 Bash Profile,實在不方便,底下有較便捷的方式:

  1. 使用 alias:

    例如設定 alias aws1='aws --profile user1'alis aws2='aws --profile user2',這樣一來,以後輸入 aws1 s3 ls 就會看到 user1 的 s3 bucket,aws2 s3 ls 會看到 user2 的。

  2. 改用 oh-my-zsh 並搭配 AWS plugin

    裝好後可以用 aspagp 來切換與顯示 AWS CLI 配置。

參考資料:

Promise.all is a useful funciton when you want to wait for more than 1 promise running in parallel to complete. However, sometimes you may want to limit the number of parallel promises. For example, you may wish to limit the number of simultaneous downloads from a website.

cwait is a convenient tool which allows you to limit the number of promises running in parallel.

Here I’ll demonstrate how to use cwait. First let’s assume we have a function later that returns a promise which is resolved after a specified timeout.

function later (time, val) {
  console.log(`later is triggered. ${val}`)
  return new Promise((resolve, reject) => {
    setTimeout(resolve, time, val)
  })
}

When we create 10 promises with later, and execute them with Promise.all, it will take about 1 second to finish the execution.

// echoNumberPromiseAll.js

const Promise = require('bluebird')

let totalNumber = 10
let timeout = 1000 // 1000 ms
let start, finish

function later (time, val) {
  console.log(`later triggered. ${val}`)
  return new Promise((resolve, reject) => {
    setTimeout(resolve, time, val)
  })
}

let promises = []
function init () {
  start = new Date()
  for (let i = 0; i < totalNumber; i += 1) {
    promises.push(later(timeout, i))
  }
}

init()

Promise.all(promises)
  .then((result) => {
    console.log(`All done. result: ${result}`)
    finish = new Date()
    console.log(`Execution time: ${finish - start} ms`)
  })
  .catch(err => {
    console.error(`error: ${err}`)
  })

node echoNumberPromiseAll.js‘s execution result:

node echoNumberPromiseAll.js
later triggered. 0
later triggered. 1
later triggered. 2
later triggered. 3
later triggered. 4
later triggered. 5
later triggered. 6
later triggered. 7
later triggered. 8
later triggered. 9
All done. result: 0,1,2,3,4,5,6,7,8,9
Execution time: 1012 ms

As you can see from the above output, 10 promises are triggered simultaneously. Because the execution time is about 1 second.

Before we can apply cwait, we have to convert Promise.all to Promise.map first.

Here’s the converted code:

// echoNumberPromiseMap.js

const Promise = require('bluebird')

let totalNumber = 10
let timeout = 1000 // 1000 ms
let start, finish

let numbers = []

function later (time, val) {
  console.log(`later triggered. ${val}`)
  return new Promise((resolve, reject) => {
    setTimeout(resolve, time, val)
  })
}

function init () {
  start = new Date()
  for (let i = 0; i < totalNumber; i += 1) {
    numbers.push(i)
  }
}

function promiseMap (number) {
  return later(timeout, number)
}

init()

Promise.map(numbers, promiseMap)
  .then((result) => {
    console.log(`All done. result: ${result}`)
    finish = new Date()
    console.log(`Execution time: ${finish - start} ms`)
  })
  .catch(err => {
    console.error(`error: ${err}`)
  })

Then we will be able to apply cwait to the above code:

// echoNumberCwait.js

const TaskQueue = require('cwait').TaskQueue
const Promise = require('bluebird')

let queue = new TaskQueue(Promise, 3)

let totalNumber = 10
let timeout = 1000 // 1000 ms
let start, finish

let numbers = []

function later (time, val) {
  console.log(`later triggered. ${val}`)
  return new Promise((resolve, reject) => {
    setTimeout(resolve, time, val)
  })
}

function init () {
  start = new Date()
  for (let i = 0; i < totalNumber; i += 1) {
    numbers.push(i)
  }
}

function promiseMap (number) {
  return later(timeout, number)
}

init()

Promise.map(numbers, queue.wrap(promiseMap))
  .then((result) => {
    console.log(`All done. result: ${result}`)
    finish = new Date()
    console.log(`Execution time: ${finish - start}`)
  })
  .catch(err => {
    console.error(`error: ${err}`)
  })

In the example above, we limit the number of parallel promises to 3. Here’s the execution result of node echoNumberCwait.js

later triggered. 0
later triggered. 1
later triggered. 2
later triggered. 3
later triggered. 9
later triggered. 8
later triggered. 7
later triggered. 6
later triggered. 5
later triggered. 4
All done. result: 0,1,2,3,4,5,6,7,8,9
Execution time: 4016 ms

The program first executes the promises with val equal to 0, 1, and 2. And waits until the 3 promises are completed. Then it executes the promises with val equal to 3, 9, and 8. and wait for them to complete …

So in the end, it takes about 4 seconds to finish the execution.
進化:從孤膽極客到高效團隊是一本談軟體工程師之間如何合作的書,書中提到的心法對於需要團隊合作的工程師非常受用。例如有一章提到在軟體開發過程中,隱藏想法、獨自工作是相當有害,會增加失敗機率,且還會錯失成長機會。

書中舉了自行車設計當例子說明:

假設你是一位自行車設計的愛好者,當你某天想出了一種全新的變速器設計。於是你訂購了零件,躲在車庫花了好幾週打造雛形。當有位同樣是自行車愛好者的鄰居問你在做什麼時,你決定不告訴他,想等到成品完成時再宣布。又過了幾個月,雛型還沒設計完成,因為你遇到了困難,但由於你不和其他人討論這個點子,你也無法向懂機械的朋友尋求意見。

然後有一天,鄰居從他的車庫裡推出一輛自行車,車上裝有一種全新的變速器。原來,你的鄰居也在研究類似的裝置,但他得到了在自行車店工作的朋友的幫助。這時你終於忍不住了,向他展示了你的設計。然後鄰居指出你的設計中存在的一些簡單缺陷。如果早點和他溝通的話,這些問題在工作開始的第一週就可以獲得修正。

從這個例子我們可以發現,如果將想法秘而不宣,堅持等一切盡善盡美才公布,那麼你就是在進行一場代價高昂的賭博。在專案早期很容易出現基本的設計錯誤,你可能會重複設計已存在的東西,同時還放棄了合作的好處。

英文跟中文都是人類用來溝通的語言,只是他們的起源不同,說起來的方式也會跟著不同。

例如在傳統的英文教學裡,當你要學會底下這句話在表達什麼時,可能是這麼教的:

The man who is talking is my brother.那個正在講話的人是我哥。

首先老師會跟你提到這兩個句子,

  1. The man is talking.那個人正在講話
  2. The man is my brother.那個人是我哥

然後跟你說有個叫「關係子句」的東西,它的用途是把一個完整的句子,放在另一句話中,當成形容詞用。

所以把第二句話變成形容詞合併到第一句就會變成 The man who is talking is my brother.

其實根本就不用知道什麼叫關係子句,因為當我們看到 The man who is talking is my brother. 與它的中文翻譯那個正在講話的人是我哥。時,我們可以很直覺地先將英文翻成

那個人(正在講話)是我哥。

這句中文唸起來很奇怪,好像「正在講話」是要在心裡唸,嘴巴不能講出來的感覺。但一般人還是可以理解它的意思,只要再將順序換一下句子就會順暢

那個正在講話的人是我哥。

如此一來,我們頭腦裡就建立出英文對應到中文的規則,透過這種方式,我們可以利用推理來學會英文文法。

The following contents are extracted and modified from Code Complete: A Practical Handbook of Software Construction, Second Edition. This is one of the chapters that impressed me. So I think I should write it down on my blog.

Software quality has both external and internal characteristics. External characteristics are characteristics that a user of the product is aware of, including the following:

Correctness
The degree to which a system is free from faults in its specification, design, and implementation.
Usability
The ease with which users can learn and use a system.
Efficiency
Minimal use of system resources, including memory, CPU usage, and execution time.
Reliability
The ability of a system to perform its required functions under stated conditions whenever required-having a long mean time between failures.
Integrity
The degree to which a system prevents unauthorized or improper access to its programs and its data.
Adaptability
The extent to which a system can be used, without modification, in applications or environments other than those for which it was specifically designed.
Accuracy
The degree to which a system is free from error, especially with respect to quantitative outputs. For example, if a calculator program on your computer says that 1 + 1 = 3, then the accuracy of the program is bad.

The difference between accuracy and correctness is that accuracy is a determination of how well a system does the job it's built for rather than whether it was built correctly.
Robustness
The degree to which a system continues to function in the pressence of invalid inputs or stressful environmental conditions.

Internal characteristics are characteristics that only the programmers of the product can be aware of, including

Maintainability
The ease with which you can modify a software system to change or add features, improve performance, or correct defects.
Flexibility
The extent to which you can modify a system for uses or environments other than those for which it was specifically designed.
Portability
The ease with which you can modify a system to operate in an environment different from that for which it was specifically designed. For example, if you find that it's easy to modify a program which was designed to run specifically on windows system to run on linux system, then portability of them program is good.
Reusability
The extent to which and the ease with which you can use parts of a system in other systems.
Readability
The ease with which you can read and understand the source code of a system.
Testability
The degree to which you can unit-test and system-test a system; the degree to which you can verify that the system meets its requirements.
Understandability
The ease with which you can comprehend a system at both the system-organizational and detailed-statement levels. Understandability has to do the coherence of the system at a more general level than readability does.

Google 試算表是款相當方便的工具,其中有一項的功能就是比對兩筆資料的交集。

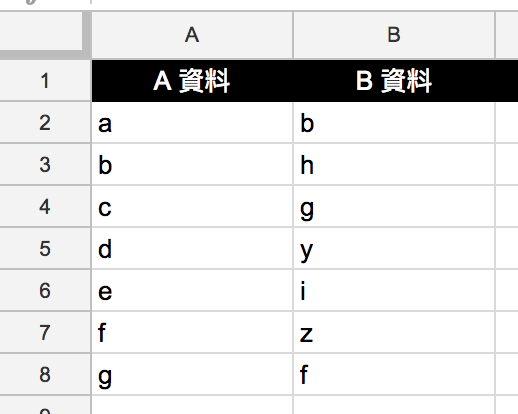
假設有 A 與 B 兩筆資料

A and B Columns

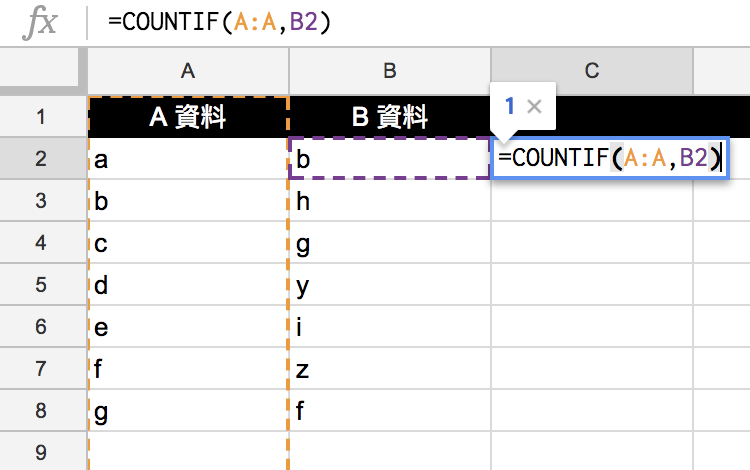
用以下方法可以找出兩欄重複的英文字母:

首先在第 3 欄輸入 =COUNTIF
,這是試算表內建的函式,用它能夠知道指定範圍內含有的資料筆數。

例如 COUNTIF(A:A,B2) 會回傳 A 欄裡有多少 B2 格子內的值

由於 B2 的值是 b,而且 A 欄裡只有 1 個 b,所以得到 1。

A and B Columns

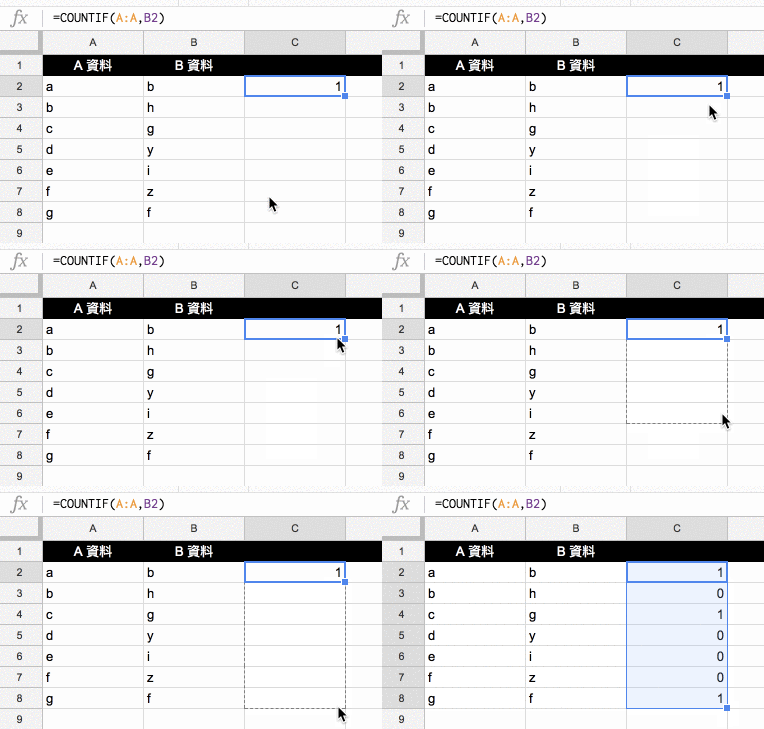
接下來在 C3 ~ C8 都套用這個函式:

對著 C2 格子的右下角按按滑鼠左鍵不放,然後往下拖到 C8 位置,這樣就可以讓 C3 ~ C8 都套用 COUNTIF(A:A,BX) 函式。

A and B Columns Drag and Drop

執行後會發現 B 欄內 bgf 三筆資料都回傳 1,其它資料回傳 0,這表示 bgf 是 A、B 兩欄交集的資料。

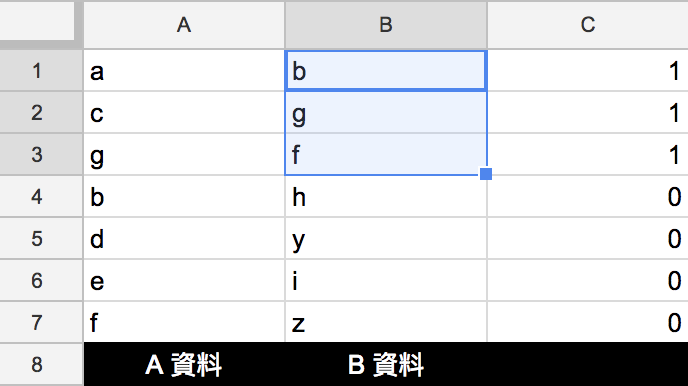
接下來的問題是如何將交集資料(bgf)集中在一起。這三筆資料分散在 B 欄的不同列裡面,資料少的時候還可以一筆一筆手動把它們挑出來,如果今天交集的資料有上百筆的話,一筆一筆的挑出肯定會花費不少時間,所以必須要有方法能快速整理出交集的資料。

這邊會利用排序功能將交集資料排在一起:

Sort

排序後可以發現 bgf 被集中在一起。

Sort

這樣我們就順利地將 A 欄與 B 欄共同擁有的資料整理出來了。

These installation steps are just for my reference. Visit INSTALLING NGINX OPEN SOURCE if you need a more detailed installation guide.

sudo apt-get update
sudo apt-get install build-essential

Next, go to nginx source releases and find the download link.
In my case it is http://nginx.org/download/nginx-1.10.1.tar.gz?_ga=1.4610931.1556411009.1493370198. Download it with wget:

wget http://nginx.org/download/nginx-1.10.1.tar.gz?_ga=1.4610931.1556411009.1493370198

Extract the downloaded file:

tar -zxvf nginx-1.10.1.tar.gz?_ga=1.4610931.1556411009.1493370198

Switch to nginx’s directory.

cd nginx-1.10.1/

Install libraries for nginx:

sudo apt-get install libpcre3 libpcre3-dev libpcrecpp0 libssl-dev zlib1g-dev

The PCRE (libpcre3, libpcre3-dev, and libpcrecpp0 ) library provides support for regular expression.

The zlib library is used for headers compression.

The OpenSSL library is used for supporting HTTPS protocol.

Configure the modules you want to install with Installation and Compile-Time Options

./configure --sbin-path=/usr/bin/nginx --conf-path=/etc/nginx/nginx.conf --error-log-path=/var/log/nginx/error.log --http-log-path=/var/log/nginx/access.log --with-debug --with-pcre --with-http_ssl_module 
make
sudo make install

For installing nginx as a service, I use initScript from https://raw.githubusercontent.com/JasonGiedymin/nginx-init-ubuntu/master/nginx

wget https://raw.githubusercontent.com/JasonGiedymin/nginx-init-ubuntu/master/nginx
mv nginx /etc/init.d/nginx
chmod +x nginx
update-rc.d -f nginx defaults

If I exeucte service nginx status now, I would get /etc/init.d/nginx: You don't have permissions to execute nginx..

This is because I made some custom configurations when installing nginx.

According to the Advanced Configuration, I should edit DAEMON and NGINX_CONF_FILE in /etc/default/nginx

echo "NGINX_CONF_FILE=/etc/nginx/nginx.conf" > /etc/default/nginx
echo "DAEMON=/usr/bin/nginx" >> /etc/default/nginx

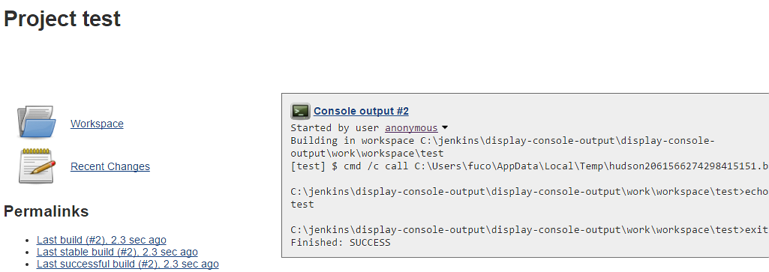
前陣子自己寫了個 Jenkins 套件 Display Console Output Plugin,會開發這東西主要是因為希望 console output 可以直接顯示在 project 頁面上,這樣可以比較快看到 build 結果。

像這樣:
stack heap

無奈使終找不到有這種功能的 plugin,stackoverflow 有人提到其它方式讓你比較快可以看到 console output,不過還是覺得不太方便。

於是我就想到自己動手開發 plugin:

先是安裝 plugin tutorial 提到的工具,然後再建個 hello world plugin。

等到對 plugin 長什麼樣比較有概念後,再來想到的問題是怎麼在 project 頁面加視窗。我想說 Jenkins Plugin 已經有一千多個,總該可以找到現成的範例才對,於是便到 Plugin Manager 搜尋 console 關鍵字,看看有沒有 plugin 會把資訊顯示在 project 頁面。

stack heap

最後發現 Console Tail Plugin 跟我想要實現的功能非常接近。

stack heap

打開 source code 發現它顯示資訊的頁面叫 floatingBox.jelly,根據這個線索我又 google 到 Action,Action 的頁面提到 If an action has a view named floatingBox.jelly, it will be displayed as a floating box on the top page of the target ModelObject.,於是就確定 Action + floatingBox 可以在某個頁面上顯示浮動視窗。

Console Tail Plugin 只有在 build 失敗時會顯示資訊,照理說我只要做些修改就可以變成我想要的功能。於是我便動手改改看,之後看到 ConsoleTailProjectAction.java 裡唯一跟 build 結果有關的只有這段

return Result.UNSTABLE.isBetterOrEqualTo(build.getResult()) ? build : null;

這段意思看起來是如果 UNSTABLE 這個 build 結果比最近一次 build 結果要好的話,就回傳 build ,否則回傳 null,於是我把這行改成 return build; 試試看,結果真的順利顯示最後一次 build 結果到 project 頁面上。

到這邊我發現我已做出當初想要的功能,不過我也知道 code 還有很多地方還沒深入了解,感覺這是個會有很多 bug 的產品,而且 console tail plugin 有些程式碼是我不需要的,這個 plugin 也無法即時顯示正在進行的 build,看來還需要改。

在 Jenkins 的 source code 裡有找到即時顯示 console output 的方式,看來這段 code 也可以參考。

Java 的 Memory 主要分成 stack 及 heap 兩部份,每個 thread 都有各自對應的 stack,stack 是個 first in last out 的資料結構。每當一個 code block 結束時,他 stack 內的 variable 就會因被 pop 出來而消失;heap 的空間則由所有 thread 共享。

Java 的所有 Objects 都存放在 heap 內,int, double, floatprimitive type 的local variables 則存在 stack 裡。

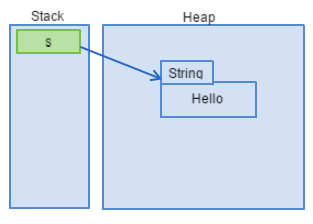
當你宣告String s = "Hello;"時,stack 內會產生一個指向"Hello"物件且名稱是s的參數。

圖一
stack heap

garbage collection 會釋放 heap 內所有無法從 stack 指向的物件。例如有段程式碼長這樣:

String s = "Hello";
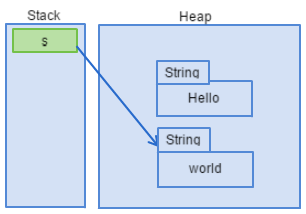
s = "world";

當執行到第 1 行時,stack 跟 heap 的狀態會像圖一那樣。執行第 2 行會導致 "Hello" 無法從 stack 內任何參數 reference 到,所以 "Hello" 在 garbage collection 後會被清掉。

圖二
stack heap

Sometimes you may want to share files between your jenkins master and slave nodes.

For example, maybe I have a powershell script, test.ps1, which contains some frequently called functions.

# test.ps1

function foo {
  echo "bar"
}

One way to share this file is save it at master, and copy it to slave node before it is called by slave node. This would require many jenkins configurations.

Recently I found that this can be easily done with Config File Provider Plugin.

First you need to install the plugin. After it is installed, you can find Managed files at http://JENKINS_URL/manage. Click it.

Managed files

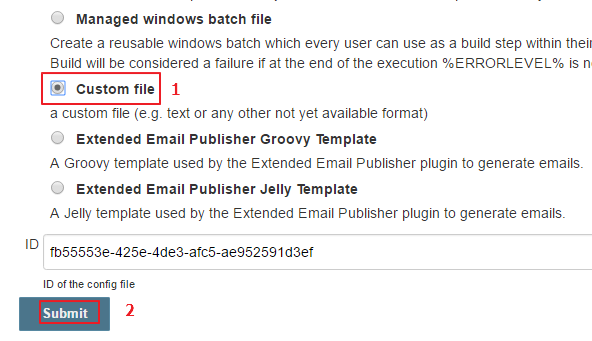
Then define your shared file by clicking Add a new Config -> Custom file

Add a new Config

Custom file

Now you are going to define the name and content of the shared file.

Custom file

Now the file is ready to be used by your jenkins projects.

Inside your project, you can find a Provide Configuration files option. Check it.

Custom file

Let’s take a look at the options here. File means the shared file you just defined.

Jenkins will create the File at the folder specified by Target (In my case, I specify the folder to be the workspace of my project).

Remember to make sure that the folder exists before building the project.

Variable represents an environment variable with which you can refer to the file.

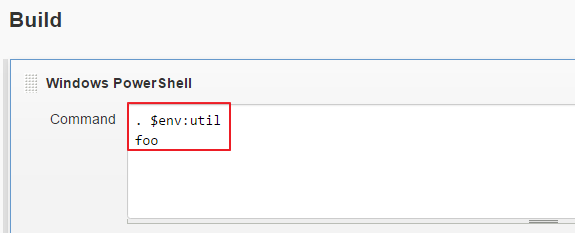
Now you can import this file no matter whether you are at master or slave node.

Import Excute

. $env:util imports the file. This makes powershell recognize foo command.